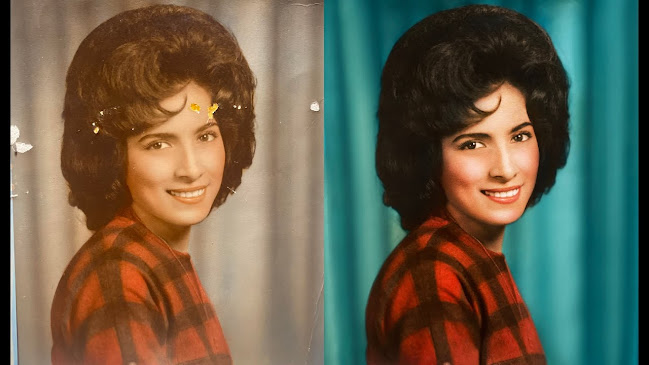
Restoring Memories: How to Restore Old Photos in Photoshop
Restoring Memories: How to Restore Old Photos in Photoshop
Introduction
Photographs are more than just images; they are visual portals to the past, encapsulating moments, memories, and emotions. However, over time, these precious photographs can deteriorate due to age, environmental factors, and mishandling. Fortunately, with modern technology and software like Adobe Photoshop, you can breathe new life into your old, damaged photos. In this article, we will guide you through the process of restoring old photos in Photoshop, preserving cherished memories for generations to come.
Why Restore Old Photos?
Before delving into the intricacies of photo restoration, it's essential to understand why this process is worth your time and effort. Old photographs often carry sentimental value, connecting us to our family history and past experiences. They are irreplaceable artifacts of our personal and cultural heritage. By restoring them, you can relive those memories and share them with future generations.
Tools You'll Need
To get started with restoring old photos, you'll need the following:
Adobe Photoshop: This powerful image editing software is the primary tool for photo restoration. You can obtain it through a subscription to Adobe Creative Cloud.
Scanners or high-resolution digital photographs of the old photos: Scanning your photos at the highest resolution possible will give you a better starting point for restoration.
Computer with adequate processing power and storage: Restoring high-resolution photos can be resource-intensive, so ensure your computer can handle the task.
Patience and attention to detail: Photo restoration can be a time-consuming process that requires careful attention to detail. Patience is your best ally.
The Restoration Process
Scan Your Old Photo
The first step in restoring an old photo is to digitize it by scanning it at a high resolution. Use a flatbed scanner to ensure you capture as much detail as possible. If you don't have a scanner, taking a high-quality photograph of the image with your smartphone or digital camera can also work, but make sure to use even lighting and a stable setup.
Open the Photo in Photoshop
After scanning or photographing your image, open it in Adobe Photoshop. Create a new project and load the scanned image onto your canvas.
Duplicate the Background Layer
Before you begin any restoration work, create a duplicate of the background layer. This serves as a backup, allowing you to compare your progress to the original and avoid making irreversible changes. To duplicate the layer, right-click on the background layer in the Layers panel and select "Duplicate Layer."
Remove Dust and Scratches
Old photos often have visible dust and scratches. To address this, select the Healing Brush Tool or the Spot Healing Brush Tool from the toolbar. These tools are excellent for spot corrections. To use them, simply click on the dust or scratch, and Photoshop will sample nearby pixels to replace the imperfection.
Fix Tears and Creases
Tears and creases are common issues in old photos. To repair them, use the Clone Stamp Tool. This tool allows you to copy a specific area of the photo and apply it to the damaged region. Adjust the brush size and hardness to match the surrounding texture and blend it in seamlessly.
Restore Faded Colors
Many old photos suffer from color fading over time. To restore the original colors, create a new Adjustment Layer by clicking on the adjustment layer icon in the Layers panel and choosing "Hue/Saturation" or "Color Balance." Adjust the sliders until you're satisfied with the color balance. You can also use the "Color Replacement Tool" to target specific areas for color restoration.
Repair Missing Areas
In cases where parts of the photo are missing or damaged beyond repair, you may need to recreate missing elements. This can be challenging and time-consuming, but with the Clone Stamp Tool, the Pen Tool for creating paths, and the Brush Tool for fine detail work, you can slowly rebuild missing portions. Be sure to match the texture and tone with the surrounding areas for a seamless result.
Enhance Sharpness and Clarity
To improve the overall sharpness and clarity of your restored photo, use the Sharpen Tool or the Smart Sharpen Filter. These tools can help bring out fine details and make your photo look crisper and more vibrant.
Add a Texture Overlay
To give your restored photo an authentic vintage look, consider adding a texture overlay. Many websites offer free texture packs that you can apply as an additional layer over your photo. Adjust the opacity and blending mode to achieve the desired effect.
Save and Share
Once you're satisfied with your photo restoration, save the image in a high-resolution format, such as TIFF or PNG, to preserve all the details. You can also create a smaller, web-friendly version in JPEG for easy sharing. Make sure to keep both the original and the restored versions in a safe place for future reference.
Conclusion
Restoring old photos in Photoshop is a rewarding and creative endeavor that allows you to reconnect with your past and share your family's history with future generations. With the right tools, patience, and attention to detail, you can breathe new life into damaged, faded, or torn photographs. As you become more skilled in photo restoration, you'll be able to preserve your family's memories and create lasting keepsakes for the years to come. So, don't let your cherished photos fade into obscurity—start restoring them today.


Comments
Post a Comment